Posts

Showing posts from 2018

Scratch Programming for Tello

Image
Just bought a Tello Drone from an online shop during Black Friday Sales in Taiwan. I was luck to get the Tello Boost Combo with 3 battery and a 3-in-1 charging hub for USD$110.2 The photo above was from DJI website. !!! Caution !!! If this is your first try to program Tello with Scratch, please do this in door first! There were few times where I placed wrong blocks and Tello just kept went up and stayed close to celling and I was unable to control it at all. This was caused by wrong command blocks I used. If I was outdoor that time, I didn't know where Tello would fly to. Download & Install  Install Scratch 2.0 Offline Editor on your Mac or PC. Download it from here:  https://scratch.mit.edu/download This is the Scratch program editor. You will write your code in this editor to control Tello. If you don't know how to use Scratch, here is a good place to learn: https://scratch.mit.edu/projects/editor/?tip_bar=getStarted Install Node.js from here

筆記 - 岳母香魯豬腳

Image
香魯豬腳岳母的拿手菜!每次回高雄阿蓮,岳母常常做這道料理。 最近剛好是自己的生日,再過一週就是太太的生日,所以我也來試做看看。 雖然已經做過兩三次,但有時煮起來很成功顏色好看豬腳Q又好吃,有時很好吃,但是顏色又沒那麼好看。所以這次把它紀錄下來,下次參考! 打電話給岳母,她只告訴我,"很簡單,按下面步驟去做就好了"...心情好像不大好...原來她要選的市長這次落選了... 口述做法: 1. 炒二片薑,十來個蒜頭不切,不壓扁下去爆香 2. 炒鍋下醬油,水、冰糖 、 大支䓤段、辣椒 3. 魯約 50分鐘很Q嫩很好吃,或魯到到個人喜好的軟嫩度即可起鍋。 材料: 豬腳一支約2斤半重 (我是傳統市場買,請商家都已去毛用熱水湯過) 薑少許切片 大支䓤段數支 蒜頭十來個 辣椒一個(看喜好程度自行調整) 醬油半碗、水兩碗~三碗 沙拉油少許 黑胡椒少許 冰糖 (必備,顏色好看的重要材料) 詳細做法: 豬腳用熱水 川燙 再起鍋備用 炒鍋下點沙拉油、二三片薑、十來個 蒜頭 不切,不壓扁下去 爆香 把 豬腳 入炒鍋下去炒, 炒 到每面有點 焦黄色 下醬油,水、 冰糖 、 大支䓤段、辣椒、黑胡椒到鍋內 把豬腳及醬料充份拌勻再蓋上鍋蓋,用 小火慢魯 .. 魯約 50分鐘 很Q嫩很好吃,或魯到到個人喜好的軟嫩度即可起鍋。

Arduino - Switch celling light with TV remote (2/2)

Image
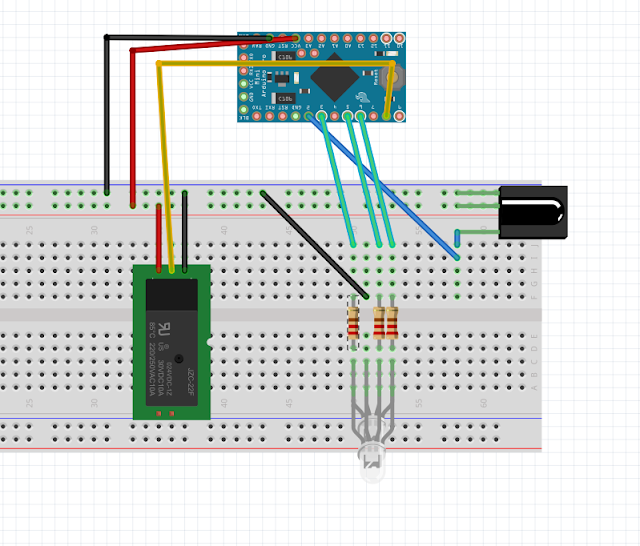
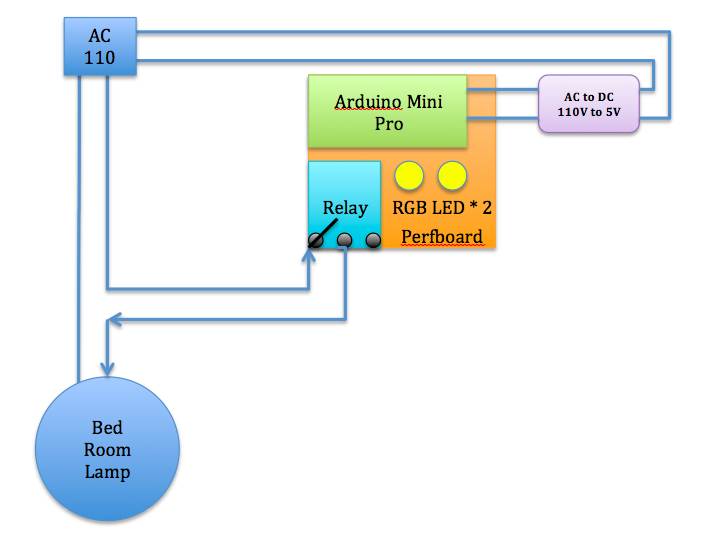
This is the part two of Switch celling light with TV remote tutorial. If needed, please check out the part one from link below. By the way,  the source code is also available there. Quick Link Tutorial Part 1:  Switch celling light with TV remote (1/2)   To find out the IR codes for you remote, check this tutorial:  IR Repeater Tutorial (Part 2) System Design See the illustration below.  I used a phone charger( purple block; AC110V to DC5V ) to supply power from 110v AC power outlet from the celling. The Arduino controls the relay module to switch the celling light and Arduino interpret IR code to change  RGB LED to shift color and on/off accordingly.  Connections IR Receiver to Arduino pin 2 IR Receiver + to VCC IR Receiver - to GND Relay + to VCC Relay - to GND Relay to Arduino pin 8 RGB Red to Resistor to Arduino pin 3 RGB Green to Resistor to Arduino pin 5 RGB Blue to Resistor to Arduino pin 6 *** CAUTION: Turn off home main power switch first

Arduino - Switch celling light with TV remote (1/2)

Image
 Preface It must be happened to you before that in a very cold night watching TV or movie in bed and you were ready for bed. You turned off the TV or DVD player with remote control easily. However, for the celling light, you just had to get out of the bed to turn the light off. What a pain!  After I searched the Internet, there are many examples out there suit for this purpose, such as IR receiver, relay module, and RGB LED shift hue and most of them have codes that I could utilize on this project.   Quick Link To find out the IR codes for you remote, check this tutorial:    IR Repeater Tutorial (Part 2) Tutorial Part 1:  Switch celling light with TV remote (1/2)   Material Needed Arduino mini pro *1  USB upload module *1  Relay module (5V/10A/125V) * 1  IR Receiver LED * 1 (Aixin AX-1838HS 38KHz * 1 / All 38KHz should work)  RGB LED *2  Resister 220 Om * 3 Few jump wires Any TV or DVD remote you have at home Breadboard * 1 It's not difficult